Tuesday, November 22, 2022

 "Creative Watercolor Media"

For my first card, I used the "Scalloped Ornaments" Stamp set as well as the "Elegant Swirls" stencil.  It is 4 1/4" x 5 1/2", top folded, on "Neenah Solar White" cardstock

For the stenciled panel I ink blended pinks and yellows, which, where they overlapped, gave me some subtle orange/peach colors.  I then covered the entire panel with "Versamark" ink and heat embossed with a clear glittery embossing powder.  It has an interesting texture, kind of like sandpaper. 

For the image, I stamped in "Versamark" and then heat embossed with fine white embossing powder.  Then I cut out the images with the coordinating die.  To color the images, I used my 24 pan set of "Altenew's" watercolors.  I chose soft pastel colors for this.  

The sentiment is from the "Best Sentiments" stamp set.  Which reminds me.... I have no idea where I put that set.  I must go on a hunt!

The stenciled panel as well as the flower image were popped up with foam tape for added dimension.


My second card is 4 1/4" x 5 1/2" and side folded.  The base is "Neenah Solar White" and the image is on "Canson XL" watercolor paper.  

I stamped the image and the sentiment from the "Paint-A-Flower, Sweet Pea" stamp set.  I used what is called no line water coloring.  I started off with "Rangers Antique Linen" for the main image so that I would not have a bold line.  This ink is usually able to blend into whatever you are water coloring so that you don't have a coloring book look with a bold line.

I ended up using both my "Altenew" 24 pan set as well as the "Altenew" Metallic watercolor set.  The sentiment is from the same stamp set.  Then to finish it off, I flipped it over and scored a frame all around the edges before adhering it to the card base.


For my final card, 5 1/2" x 4 1/4" top fold, the card base is "Neenah Solar White" and for the first panel I used "Canson XL" watercolor paper.  

To begin, I used the "Leaf Clusters" stamp set and placed them randomly around on the watercolor paper using my "Misti".  I then wet the entire watercolor paper, inked up the stamps and placed onto the wet paper.  I did this several times and waited for it to dry.  Once dry I filled in the negative areas with a pale yellow watercolor wash.  After that was dry, I put the panel back into my " Misti" and stamped again, over the puddled yet dry image.  It kind of reminds me of a shadow after I had stamped the images onto the dry watercolor paper.  

The sentiment is from the "Halftone Smile" stamp and coordinating die sets.  Both the watercolor panel and the "you make me" sentiment is popped up with foam for added dimension.  To finish it off, I splattered some gold paint randomly across the card.


Thanks for looking!

"Beyond Basic Backgrounds"

I love this, it gives me a chance to start with the background and then I add the stamps.  More times than not, I pick my stamp set first and then go from there.

My first card uses the "Leaf Clusters" stamp and die set.  This size of the card is 5 1/2" x 4 1/4", top folded and "Neenah Solar White" cardstock for the base and panels.

I first ink blended my panel using "Distress Oxide" inks.  I then did the water bleaching/baby wipe technique with the stamps randomly in my "Misti".  I did this several time, however I still had not achieved the look I was going for.  I then stamped a flannel background image with "Hero Arts -Unicorn" ink and then heat embossed with a fine detail clear embossing powder.

The sentiment is also from the "Leaf Clusters" stamp set.  The leaf was cut out in green cardstock using the coordinated die set.

Both the leaf and the main panel is popped up with foam for added dimension.  To finish off the card I added some faceted flat back baubles.


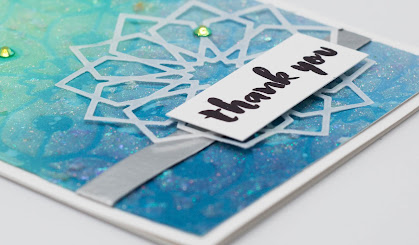
For my second card I ink blended an Ombre look in blues to green.  I then used the "Layered Medallion  B Stencil" and "Unicorn" effect paste by Finnabair. 

While that was drying I die cut out of vellum the large image from the "Dodec Star" die set.  I also heat embossed the silver panel several times to build up a nice fluid silver.   The sentiment is from the "Painted Greetings" stamp set.  All were layered flat except for the sentiment panel, that was popped up with foam tape.  To finish this card off I added some faceted, flat backed jewels.


My final card was quite the mishmash.  It measures 4 1/4" x 5 1/2" top folding on "Neenah Solar White" Cardstock.
The background panel was created with acrylic paint and gel plates.  The die cut layer is from the "Tangled Loops" cover die.  On it, I did some simple ink blending, then added gold ink in various places.  Once adhered to the background, I flicked metallic blue acrylic paint as well as gold ink all around.

I have no idea what stamp set the sentiment if from (please let me know if you know what it is) but I do know it is from "Altenew".  Anyway, it was stamped with "Versamark" ink and then heat embossed in fine detail silver embossing powder.

For a very subtle embellishment, I coiled up some silver thread and placed it behind the sentiment, which was popped up with foam.


 Wow!  I have been on quite the hiatus.  With going out of state without any papercrafting supplies, and then having major surgery with complications, I am finally back!

My first post from Level two of the AECP course is "Beautiful Details" By Marika Rahtu.  She does some amazing detail work.  Mine certainly were not at her level.  Something to strive for.

In this card I used a couple of the leaf stamps from the "Marbled Boom" stamp set.  I used the same ink with my fresh new flowers.  To get the variances in shade I would ink up and stamp several times before I re-inked.  This card is 5 1/2" x 4 1/4" top folding on Neenah Solar White cardstock, then mounted with foam tape on a dark plum cardstock which was then mounted onto the card base.  The sentiment is from one of my favorites....."Seasonal Blooms" the first layer (black) I used the coordinating shadow die and the second layer (detailed) I cut out of shiny gold cardstock.  To finish it off I gave the card some splatters here and there . This card is very mellow compared to other cards I usually make.  At first I hated it, but it has grown on me.


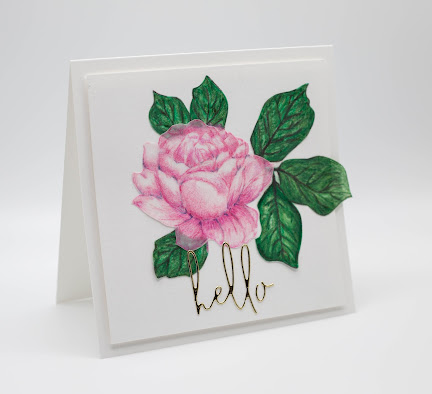
For my second card, I used Prismacolors on the back of vellum cardstock.  This card is 5" x 5", top folding.

  I stamped the image from the ""Build a Garden Magnificent Branch" set. To make it visible to me, I stamped it in "Versamark" ink and then heat embossed with a fine clear embossing powder.  That became the back of the image and I colored on the now reversed side (the side that is not heat embossed) which will be facing up.

The sentiment is from the die that is from the "Seasonal Blooms" stamp and die set cut out of shiny gold cardstock. The flower, leaves and sentiment are flat mounted onto "Neenah Solar White" cardstock which was then mounted with foam tape onto the card base.


Thanks for reading!